I often hear, “My yard is so shady that I can’t grow anything.” To which I get my big cheesy grin going and say, “Oh yeah you can! Mushrooms love shade!”
Growing mushrooms outdoors is much easier than you may think.
Primarily, I grow three types of mushrooms: shiitake, oyster, and wine cap. These types are easy to grow, tasty, and versatile. I grow shiitake and oyster mushrooms on logs, and the wine cap mushroom, also known as King Stropharia or Garden Giant, I grow on wood chips. All three of these have a wide temperature range for growing as long as there is moisture—make that moisture, moisture, moisture! I If you retain nothing else from this post, simply remember: moisture = mushrooms.
Log Culture – The Nitty Gritty

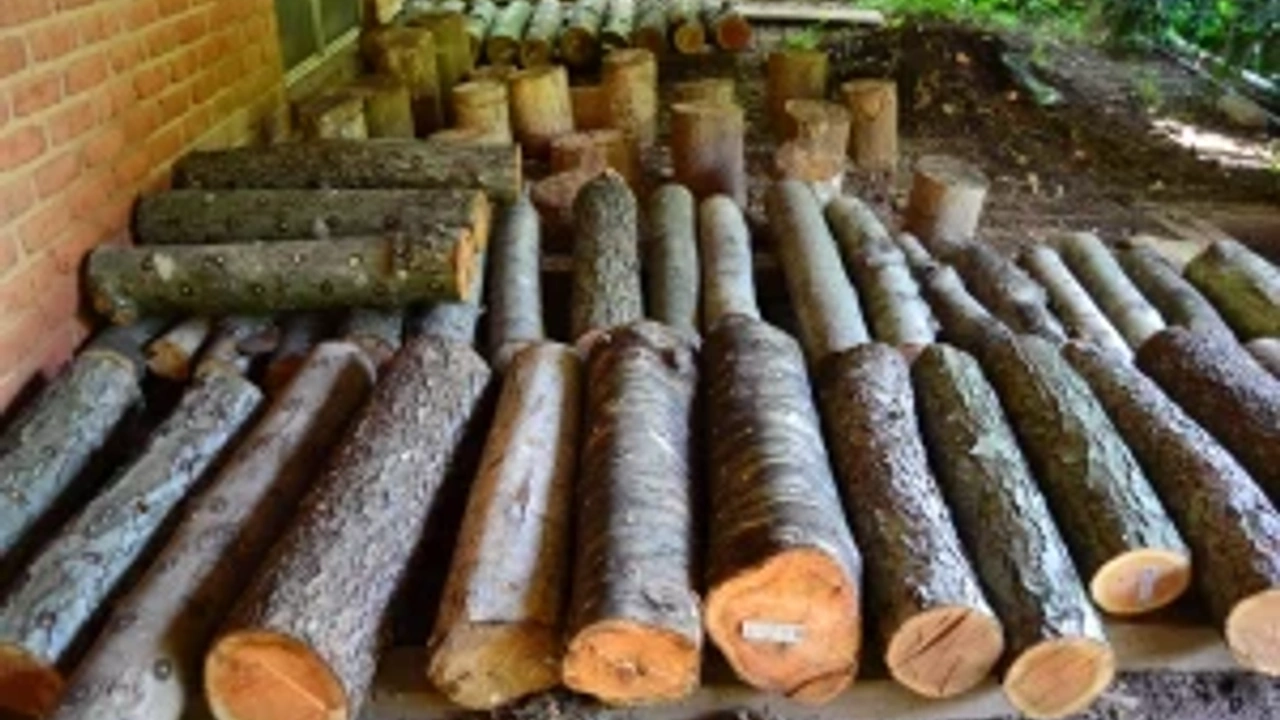
Many types of trees can be used for growing edible mushrooms. In general, you should use hardwoods like maple, poplar, willow, birch, and beech, while avoiding species such as black locust, black walnut, and most evergreens. Our land here in Maryland is rich in tulip poplar and hard maple, perfect for oyster and shiitake, respectively. Oak is the king wood for shiitake, with its thick, protective bark and strong, long-lasting wood. A good oak log can produce beautiful shiitakes for up to eight years, whereas a softer wood like poplar may produce for only three to four years.
Now, you might be thinking, “How is cutting down trees to grow mushrooms ecological?” Our forests have lamentably been chopped down multiple times since the ‘new world’ began and the resulting regrowth is usually a cluster of crowded saplings. A practice of sustainable forestry is the thinning of small diameter trees to allow the larger, more mature trees to grow and to let in more sunlight that helps regenerate the forest floor. These saplings are the perfect size for log cultivation.
Fungi Growing Medium
Fungi, the mushroom body, is made up of thread-like cells that weave together to make a network. When ready to fruit and release spores (seed), up pops the edible shoots we love so much. If you have ever kicked aside the leaf litter in a forest and seen the white webbing, then you’ve seen fungi. We call these threads “mycelium.”

For mushroom cultivation, we want specific fungi mycelium (i.e., shiitake and oyster strains). The mycelium growth is started on sawdust, straw, grain, or little wooden plugs. When inoculated with mycelium these mediums are called “spawn.” Think of them as kindling to get the mycelium going. For beginning ease, I suggest purchasing spawn with mycelium on them from one of the many fine mushroom supply outfits; ideally, one close to your weather range. I am a big fan of Field & Forest. Their claim is: “Proud to be part of this rotting world.” Their website and online catalog are a perfect package of how-to’s and materials for beginners. Field & Forest www.fieldforest.net.
There are numerous spawn options, but for small-scale use, I prefer the plug spawn. Plug spawn are little birch dowels that arrive covered in the mycelium variety you choose. These spawn will be inserted into the logs.
Drilling Diamonds

Once you have your ‘shroom zone’ set up (see ch. 3 in Edible Landscaping with a Permaculture Twist) it’s time to arm yourself with a drill. The logs are going to be drilled in a diamond pattern. Start the first row two inches from the log’s end. Space the holes every six inches. The depth of the hole is important. Ideally, the plug will be inserted to a depth just below the bark, almost flush, but not sticking out, about 1 inch deep. Field & Forest sells ninja drill bits that have stoppers on them for the correct depth, but I have used a piece of tape or a pen mark on the bit to eyeball the depth. It’s good to drill a few holes and check the depths by tapping in the spawn to see how it fits. Soon, you’ll get the feel for it. Use caution not to drill too deep, as that leaves a dry air pocket.
Once you have your first row done, rotate the log two inches and begin the next row, starting between the first two holes of the previous row, approximately five inches down. Continue rotating the log two inches for every new row and offsetting the holes to create a diamond pattern. The inches here are approximate so don’t get worked up, just pull on the brew for balance. Drilling this many holes is a bit overkill, but it’s necessary to make sure that our chosen fungi is the one that colonizes and out-competes any other funky airborne fungi.
Whacking in spawn plugs is fun. Those skills you built up playing the fair game Whack a Mole are about to pay off. As fun as whacking stuff may be, we need to be careful not to damage the bark. The bark on your log is the skin that keeps the moisture in, so handle it gently. Oaks, with their thick bark, are favored in this process; poplars, with thin and brittle bark, not so much. Some folks recommend using rubber mallets, but I find workshop participants tossing them aside in favor of the metal hammer. Now, armed with your hammer and bag of spawn, let’s get to it. Keep in mind that the bag of spawn is sensitive to drying out and should be protected from sun and wind while working.
About the time I’m ready to start whacking in spawn, I set up my hybrid wax melting station. This station uses an old Coleman, two-burner propane gas stove. I set this up about 20 feet from the drilling and whacking stations, as the wax smoke can get thick and the wax will inevitably drip. I’ve seen set-ups in the garage with a plug-in burner and tarp underfoot, but that somehow loses the outdoors mystique. Both approaches work. For a pot, I use an old fondue pot, but really any pot will do. Some more legit folks might recommend using a double boiler and putting water in the bottom of the first pot or even just placing a metal bowl in a pot with water as makeshift double boiler.

I use a cheese wax that I get in big chunks cheaply from Field & Forest, and it seems to last forever. Start off with a fist-sized chuck. It’s a bear to lop off the block, but I find an ax or shovel does the job just fine. I crank the heat to medium high and watch until the wax melts clear and starts to fine bubble. Then, turn the heat to low, around 300 degrees. You want the wax to be as hot as possible without catching on fire. I judge the heat by the smoke; a thin smoke is good, while a thick one is getting close to the flash point. Often during workshops, where I have a small army of first-time drillers and whackers, I forget to turn the wax down and it catches on fire. It’s no huge blaze, but you cannot salvage the wax once it’s caught fire. I carefully take it off the burner, dump it on the gravel drive, and start again. The flash point is easier to control with a double boiler set up. The trick is to have the wax hot as possible to ensure a good seal that traps moisture and keep critters out; otherwise, the wax can dry and peel off. Once your wax is hot, use a small bristle brush, a steel baster, or wax daubers (which are a dollar a pop from Field & Forest) to dab the wax over each spawn.
If you have, or plan to have, multiple types of mushrooms, it is a good idea to label the logs with aluminum tags nailed into the log’s end. Put the type, variety, and date. It will help to track what does well, to make recommendations to others and be sure you are harvesting the right fungi.
A Shady Place for Some Shady Characters

The next stage in the fungi journey is one of the most critical: the spawn run. This is when the mycelium jumps off the spawn into the log and begins to colonize it. This can take anywhere from six to eighteen months. Be patient and have faith. Place the logs flat during the spawn run, just off the ground an inch or two. Moisture during this time is key. The logs want to be placed in a shady place that imitates a forest setting, out of the wind, and, ideally, close to the house and watering source. If you have a naturally moist, shady area around your house, that is a good spot. My new favorite place to stash logs is under the deck, where water falls through and the house blocks the wind. The fungi love it! Another good spot is underneath evergreens that are porous and allow enough water to fall through. You can create your own shade with a 60-80% shade cloth draped over straw bales with logs laid in-between.
Keep your logs moist, water like your garden. If there has been no rain they need the equivalent of about one inch of water a week. You can either hose them and the area around them down once a week, or set up a sprinkler and run it for 15-20 minutes. Once the logs fruit lean them up to view and easily harvest the mushrooms. To learn more details about log care link here: Mushroom Log Care Guide.
Harvest & Use
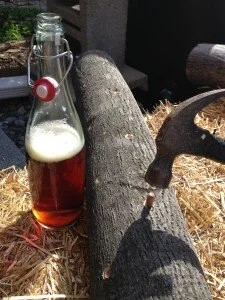
When the logs fruit, usually after a warm spring or fall rain, simply cut the mushrooms off at the base, being careful to not pull off chucks of the bark. Then, the sky’s the limit for enjoying and preserving them. You will be amazed at the abundance a log produces at once. If you can get past sautéing them in butter and garlic or making creamy mushroom soup, then they are easy to dry and store. My personal favorite preservation is shiitake vodka! (See recipe below.) But for you teetotalers, a mushroom-infused olive oil with peppercorns and hot peppers is a tasty treat and great gift.
Wine Cap: King Stropharia

True to its name, wine cap mushrooms are a pleasure to consume and a breeze to grow. Also known as Garden Giant or King Stropharia, this mushroom can grow as big as five pounds! They are succulent, taste meaty, slightly nutty, and delicious. Very easy to grow—and no chainsaw is needed! Unlike the log-culture method of growing mushrooms wine cap inoculation can be started throughout the season and only needs wood chips and dappled light to flourish. And, boy, are they fast to fruit! A planting in early spring can fruit that same season, although occasionally they can take a full 12 months to bear fruit.
I get my wood chips dropped for free from a local arborist. All I ask is that they are not pine or from the side of the highway (sprayed with chemicals). The fresher, the better; but chips up to three months old will still work fine.
The Mushroom Patch
Watch this video about cultivating winecap mushrooms.
The Wine Cap mushroom patch can be any shape you’d like. You can make it a new mulch ring for a much-loved tree or as a stamp shape under a setting of deciduous trees. I often fashion mine as I do for food forest patches, about 10 feet by 10 feet. If the site is not completely bare to the soil I put down cardboard first to reduce competitor fungi then dump the wood chips on top about two inches thick. If the chips are not moist be sure to wet them thoroughly with a hose as they go down. For the first planting, you will start with a bag of sawdust spawn from a supplier. After that, you should never again need to buy spawn, as the Wine Cap easily self-propagates.

A 5.5-pound bag of sawdust spawn, which runs about $25, will cover at least 50 square feet. With that in mind, sprinkle out half the total dose of sawdust onto the moist chips. Next, drop on another two inches of moist chips and add the second half of the spawn to the top. Mix the spawn on top in a little with a metal rake or by hand. Last, sprinkle on fresh straw and water down. Do not worry if the straw begins to sprout grass; it will only help the Wine Cap trap more moisture.
Keep the patch moist as you would your garden. Expect flushes of mushrooms throughout the season from late spring to fall; wine cap has a wide range of fruiting temperatures (40F to 90F). After the first fruiting, either feed the patch more wood chips or scoop a bucketful from the mycelium-rich patch and start a new one, using a ratio of approximately 1:20 (or one bucket of spawn to 20 new chips). Or let it go and plant right into the rich compost it has created.
Without continued feeding the patch will expend itself into fertile compost and stop fruiting. To re-feed the original patch just dump on 2 to 3 inches of moistened fresh chips, mix in well and recover with straw.
Siting
Unlike the log culture, your wine cap mushroom patch would like a little interface with light. I place my patches under deciduous trees that interface with the lawn, where moisture seems to naturally cycle. I have also successfully grown wine caps under a shade cloth rigged up out in the middle of a sunny garden. And I have failed when trying to grow them in deep shade, though I did get an awesome compost pile from it. Even a few hours of direct sunlight will not undo the wine cap, but instead help stimulate the moisture flow to the surface where the mycelium is growing.
In mid-summer, once the mycelium has run through the chips, I take a bucketful of mycelium and spread it under my garden veggies, particularly the tomatoes and zucchinis, forming donut shapes around the base of the plants. The leaf coverage and moisture of the plant is just right for the wine cap to thrive and fruit. It also boosts the plants’ nutrient uptake. Then, when I’m out harvesting my dinner I’m able to easily add in tasty mushrooms to boot!
A Word About Mushroom Safety
You may be wondering if is safe to eat any ol’ mushroom that grows out of the log. The answer is an emphatic “Hell No!!”
If your spawn variety has not successfully run and colonized the log, it’s possible that another airborne fungi has set up shop. Only harvest the type that you inoculated the log with and have a picture of what that is. If you inoculate a shiitake, only harvest a shiitake. Oysters and shiitake are easy to identify. The beauty of growing your own mushrooms versus hunting for them is that you know exactly what is supposed to pop out.
How to Save the World! Ninja Mushrooms
We can pair with fungi right at home to help repair our damaged ecosystems and watersheds. Our watershed health begins where we live. The water running off our driveways, roofs, swimming pools, and lawns heads downstream fast. Pairing with fungi, we can filter the funk running onto and off our landscapes—and even the petrochemicals from our cars—very easily.

Multiple classes of fungi can be used to restore our habitats; however, some of the best types are the ones we’ve just learned about: saprophytic mushrooms, such as oyster and wine cap.
The mycelial matt that is formed on the wood chips acts as a filtering web that traps and consumes a wide range of chemical toxins, silt, and pathogens. A great way to package these mycelium-filters is by stuffing burlap sacks full of wood chips and inoculating with spawn—same idea as the patches. Again, be sure the chips are moist, then insert either a handful of sawdust or plug spawn in the middle as you are filling the bags. Stack the sacks in dappled shade and keep moist for a couple of months, by which time, the mycelium has run rampant. Regardless of your spawn success, or even if you don’t inoculate the sacks yourself, just by placing the chip-filled sacks in the moist shade will cause fungi to come.

These sacks of mycelium filtration can be placed in any number of locations around the landscape. In pictures the pictures here I have dug a small trough in the lawn where multiple gutter spouts flush toxic roof runoff into a creek just down slope. I wedged in three sacks filled with wood chips and inoculated with wine cap, covered them with cardboard to add moisture retention and topped with four inches of woodchips bringing it all flush with the grass. This simple little myco-remediation patch will make a huge difference in mitigating the toxins in the runoff from the roof. Each year, add a few inches of wood chips to the top layer to maintain the food cycle and moisture for the fungi.

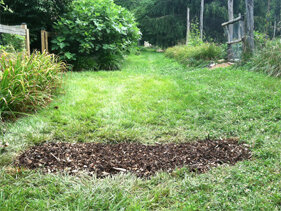
This simple design is a huge stewardship for our watersheds whose largest toxic loads come from our homes.
Similarly, placing the sacks along the driveway filters runoff and cleans up our waterways and watersheds. These filters can be done in a myriad of creative ways that can also become amazing planting beds. Place the sacks adjacent to the drive where water sheets off and filters through the wood chip media. If the flow is strong at any one point, buffer the in-flow with rocks or line the edge with rocks to help hold in the chips. Another efficient way to hold the water on your landscape and filter is to sink this runoff in a raised bed swale, placing the chips in loose, no sacks needed. This way, you are both filtering and also harvesting the water. In essence, you are setting the stage for the best composted soil known, another variation of the rain garden.
I did a variation of this stacked function in one of my young forest gardens. I marked and carved a swale on contour, creating a raised bed on the downhill side, where I’ve planted juneberries, paw paws, and persimmons that are beginning to cast shade. In the dugout portion of the swale, which now becomes the path, I put in wood chips and inoculate with wine cap spawn from one of my patches.

Using the same idea as the sacks, I cover the inoculated chips with cardboard and then another four inches of chips. There are so many stacked functions to this design: the rainwater runoff held in the swale keeps the chips and fungi moist, the mycelium enriches the soil for the trees, I stimulate the mycelium by walking on it, and the compost it creates I just chuck on the bed and start another fungi path! Love it!! That’s my kind of ecological footprint.
**To learn about other ways of outdoor mushroom growing such as inoculating stumps and material lists/cost see chapter 3 of Edible Landscaping with a Permaculture Twist.
Other recommended reading for both cultivation and restoration is Mycelium Running by Paul Stamets.
